Fast startup isn’t an ideal solution for every scenario. And there may be times when you want to disable this feature. Let’s look at some of the most common reasons you might want to turn off fast startup on your Windows 11 PC.
Why Should You Disable Fast Startup on Windows
The fast startup feature shortens boot times but that comes at a cost. It prevents your PC from shutting down entirely, you may have difficulty installing Windows updates at times. Also, with fast startup enabled, Windows locks down the hard disk during a shutdown. This prevents you from accessing your hard drive from other operating systems. Hence, you might want to disable fast startup if you’ve set up your PC for dual boot.
Furthermore, you may not be able to access BIOS/UEFI settings on some systems with fast startup enabled. So, if you want your PC to shut down completely or have a dual boot setup, you should consider disabling fast startup on Windows. There’re several ways you can go about this. Let’s take a look at all of them.
1. Disable Fast Startup Using Control Panel
Using Control Panel is an old-school way of making changes to your Windows computer. Here’s how you can use it to disable fast startup on Windows. Step 1: Click the search icon on the Taskbar, type control panel, and select the first result that appears.
Step 2: Use the drop-down menu in the top-right corner to change the view type to small or large icons. Then, go to Power Options.
Step 3: Click on ‘Choose what the power buttons do’ from the left pane.
Step 4: Click on ‘Change settings that are currently unavailable.’
Step 5: Select Yes when the User Account Control (UAC) prompt appears.
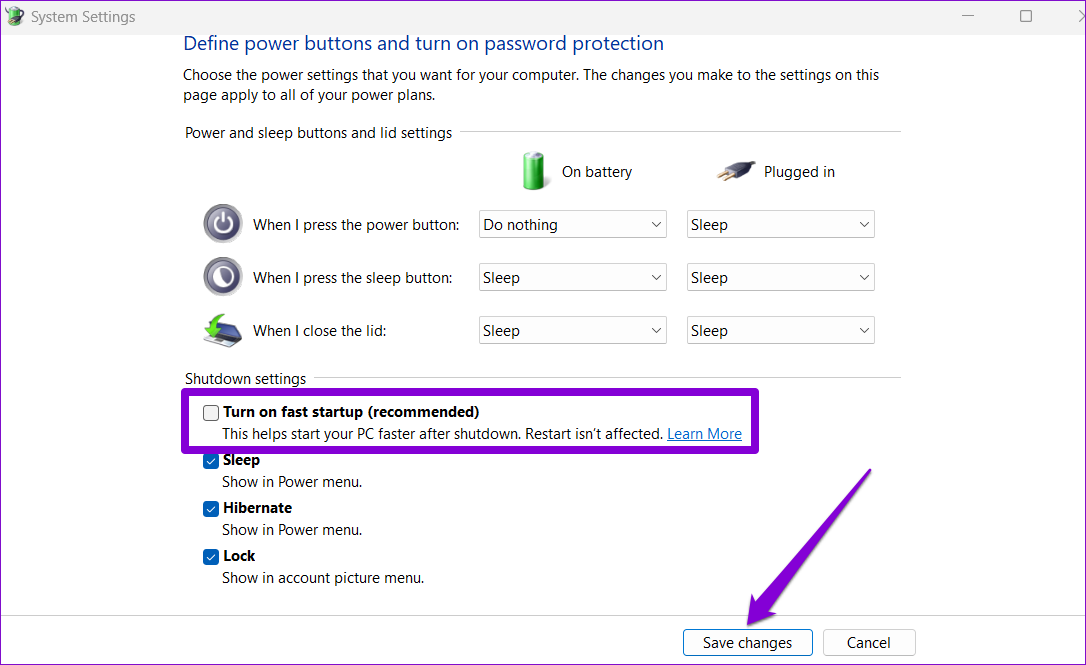
Step 6: Uncheck the ‘Turn on fast startup (recommended)’ option and click on Save changes.
2. Disable Fast Startup via Command Prompt
Command Prompt is a powerful tool that allows you to run scripts, repair system files, and perform advanced administrative tasks. You can also use it to change your PC’s power plan or disable the fast startup feature. Here’s how. Step 1: Press the Windows key + X to open the Power User menu and select Terminal (Admin) from the list.
Step 2: Select Yes when the User Account Control prompt appears.
Step 3: In the console, run the following command:
Once you run the above command, the fast startup feature will be disabled.
3. Disable Fast Startup From the Group Policy Editor
You can also change the Group Policy settings to disable the fast startup feature on Windows 11. However, you can only use this method if you’re using the Windows Professional, Education, or Enterprise edition. If you’re using Windows Home, you can use the Registry Editor instead. For that, skip to the next method. Step 1: Press the Windows key + R to launch the Run dialog box. Type gpedit.msc in the Open field and press Enter.
Step 2: In the Local Group Policy Editor window, use the left pane to navigate to the following folder.
Step 3: Double-click the ‘Require use of fast startup’ policy on your right.
Step 4: Select Disabled and hit Apply followed by OK.
4. Disable Fast Startup From the Registry Editor
Another way to disable fast startup on Windows is using the Registry Editor. Since this method is risky, you should only use it if none of the other methods work. Even if you’re familiar with the Registry Editor, you should follow the steps carefully, take a backup of your Registry files, and create a restore point before proceeding with this method. Step 1: Press the Windows key + S to open Windows Search. Type registry editor in the box and select Run as administrator.
Step 2: Select Yes when the UAC prompt shows up.
Step 3: In the Registry Editor window, use the address bar at the top to navigate to the following key:
Step 4: Within the Power key, locate the HiberbootEnabled DWORD. Double-click on it and change its value to 0 (zero). Then, click on OK.
Exit Registry Editor and restart your PC to apply the changes. If you wish to re-enable fast startup at any point, follow the same steps above and change the Value data for HiberbootEnabled DWORD to 1.
Speed Thrills but Kills
Fast startup is a feature that comes pre-enabled on Windows 11 computers. While the feature is not harmful, you may want to turn it off for various reasons, some of them are covered above. You can use any of the methods listed above to accomplish it. The above article may contain affiliate links which help support Guiding Tech. However, it does not affect our editorial integrity. The content remains unbiased and authentic.